In the beginning there was a tree….
Early last year we were collecting some slab wood from a managed woodland in Hambledon and Dan ordered some Western red cedar. Rick the woodsman cut the cedar into 10ft planks and delivered it to us in august 2012.

| This ones not from the woodland! |
We decided to make a 9 ft plus long board. We designed a board using mesurements from one of Dan's old boards and a computer programme. The design was a long board shape and the computer software gave us the shape and measurements of frame that would become the inside of the surfboard. Templates for the frame arrived and we copied them on to marine ply then cut them out with a jigsaw!

Samantha and David Cambridge measuring Daniels old surfboard

Francis Samantha and Adrian cutting out the frame templates

| Patrick, Shaun and James cutting out templates |
When deciding to build such a long surfboard we realised that we needed also build our own ingenious rocker table.

| Gemma tightening the adjustable slats |
 |
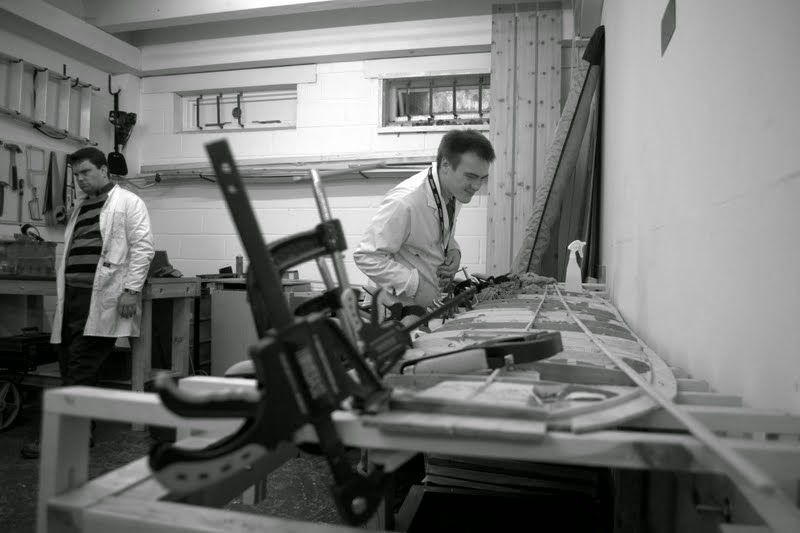
| Patient Planners! |

| Some more planning! |
Dan came up with a clever gluing technique that worked a lot
better the second time. Once the planks were glued together to make our ‘skins’
we used the belt sander to make the top and bottom smooth. Although the expanding
foam glue (gorilla glue) we used made quite a mess once the planks had been
sanded they look very good. The western red cedar with the mahogany strips (we
got the mahogany from John) is a lovely combination. It feels like the surfboard
is coming together after months of preparing wood and it’s almost possible to imagine
it in the water.

| The finished skin! |

| Skeleton ready to be glued onto the skin |

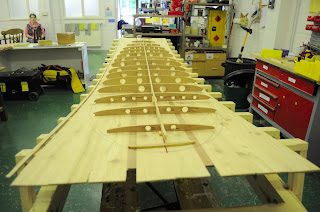
Now we are going to glue the surfboard frame (we call it the skeleton) to the bottom skin of the surfboard. we jigsawed the frame out of 6mm marine ply and it fits together well.
We are cutting small blocks of wood to make sure the frame glues nice and straight. We have to cut and glue seventy two small blocks
Seeing the frame layed up on the skins gives a really good idea of what a hollow wooden surfboard is, and the shape our board will be.
When the frame was glued down the next job was to glue a chine strip that forms the outline of the surfboard. It fits in a notch we cut out of each of the frame pieces.

The rails of the surfboard are made from 6mm x 12mm strips of cedar that we machined down with a bead and cove profile using a router. We have done this so the rail strips interlock and are machined so that when glued together they can follow the curve of the rail.
Each strip was individually glued and had to be steam bent where the curve of the board was most extreme / the nose and tail.


It took quite a long time to glue all of the strips of wood that made our rails .Our aim was to get them glued before christmas and we did merry christmas we had the bottom and sides of the surfboard next we gave it a nose and tail and added a tail block to take the fin leash plug and vent hole the vent hole is very important as the surfboard is hollow the air inside can expand and contract if it could not breathe the wood would crack the vent hole is sealed with a nut when the surfboard is in the water so it does not fill with water and sink

Now we are going to glue the surfboard frame (we call it the skeleton) to the bottom skin of the surfboard. we jigsawed the frame out of 6mm marine ply and it fits together well.
We are cutting small blocks of wood to make sure the frame glues nice and straight. We have to cut and glue seventy two small blocks
Seeing the frame layed up on the skins gives a really good idea of what a hollow wooden surfboard is, and the shape our board will be.
When the frame was glued down the next job was to glue a chine strip that forms the outline of the surfboard. It fits in a notch we cut out of each of the frame pieces.
The rails of the surfboard are made from 6mm x 12mm strips of cedar that we machined down with a bead and cove profile using a router. We have done this so the rail strips interlock and are machined so that when glued together they can follow the curve of the rail.
Each strip was individually glued and had to be steam bent where the curve of the board was most extreme / the nose and tail.
It took quite a long time to glue all of the strips of wood that made our rails .Our aim was to get them glued before christmas and we did merry christmas we had the bottom and sides of the surfboard next we gave it a nose and tail and added a tail block to take the fin leash plug and vent hole the vent hole is very important as the surfboard is hollow the air inside can expand and contract if it could not breathe the wood would crack the vent hole is sealed with a nut when the surfboard is in the water so it does not fill with water and sink


Please share to us the detailed plan of this project. We wanted to share this design to the local in the Philippines. Thank you.
ReplyDelete